We spend a lot of effort in maintaining proper sanitation in the kitchen. We keep our hands clean, we keep our food clean, we observe cleanliness in food preparation. What about the utensils? Of course, we wash them well and keep them away from dust and dirt until the next use. We clean the stove top after every use. We sponge greasy spots and wash the grills.
Ovens do get dirty
But what about the oven? When was the last time you cleaned your oven — inside and out? Just because the oven has a tightly closed door doesn’t mean dirt doesn’t get in. When we cook meat in the oven, for instance, the oily steam sticks to the oven walls. And when we grill or broil in the oven, oil actually spatters on the oven walls, floor and even the interior of the glass door.

Trust me. I’m an expert at oven cleaning after having made so much mess inside my oven. One time, I roasted a duck in a too-shallow tray. As the duck skin started to brown, the fat liquefied and the too-shallow tray was unable to contain the drippings. And the fat dripped onto the oven floor and there was shit holy smoke in the kitchen that was so thick that Speedy thought the house was burning.
Another time, I baked a custard pie and used a pan with a removable bottom. The still-liquid custard seeped through the edges of the removable bottom before it solidified and I had burnt custard on the pullout grill and the oven floor. So, yes, I’ve done a lot of oven cleaning in my life.
When to clean the oven
Just like the stove top, it is a good practice to clean the oven after every use. And the best time to clean the oven is while it is still warm. If you wait for the oven to cool before cleaning, the oil and grease will solidify on the enamel interiors and it will be harder to get rid of them.
What do I mean by cleaning? Just sponge off the oven walls, floor and door? Well, unless you used the oven for something NOT messy, like baking bread, you really have to thoroughly clean it especially after roasting or broiling or grilling meat. And what does “thoroughly clean” mean? Here, I’ll show you.
Removable and immovable parts of the oven
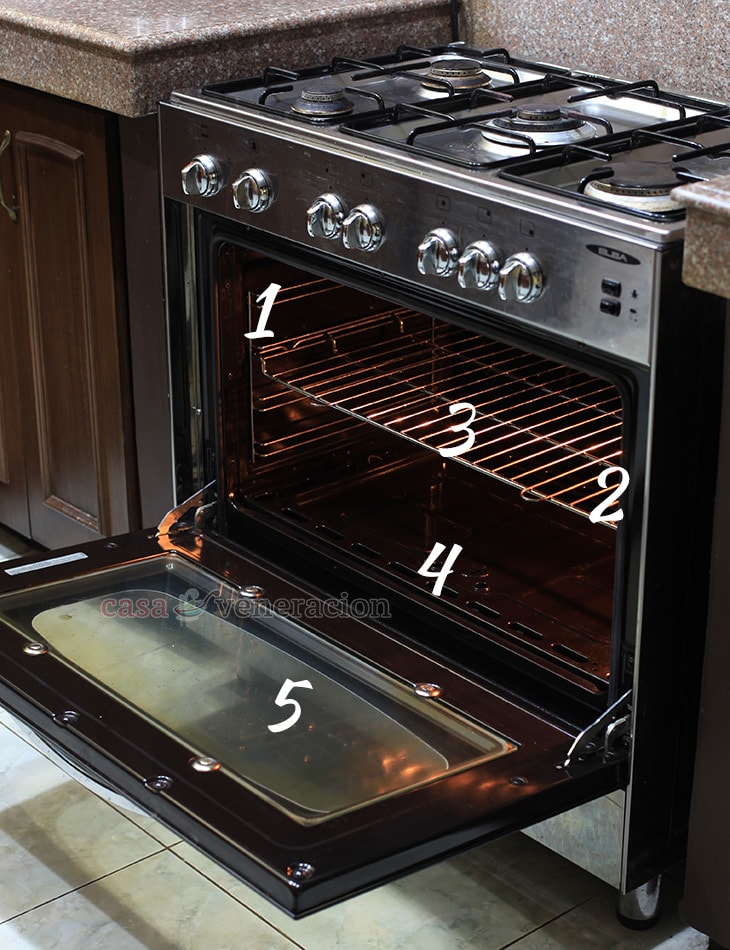
Ovens have removable parts. I labeled them above. Numbers 1 and 2 are the side racks; number 3 is the pullout rack where your baking tray or dish goes; number 4 is the oven floor and number 5 is the oven door. Yes, the door is removable.
Note that oven brands and models differ and what I’m showing you is a gas oven. I have an electric (convection) oven too and the floor is not removable. The side racks are built in and not removable either.
Study your oven to find out which can be removed. Consult the manual if you need to. Why? Because the best way to clean the removable parts is to actually remove them and wash them one by one. Well, the oven door doesn’t have to be removed after every use — an occasional top to bottom cleaning is okay — but all the rest should be washed fairly often.

That’s the oven after the parts labeled number 1 thru 4 have been removed.
Cleaning the immovable parts of the oven
To clean the oven walls, I used a sponge and warm soapy water. And, I repeat, the best time to clean those walls is while the oven is still warm because the oil and grease are “softer” and easier to wipe off.
When the walls felt clean (I use my fingers to test whether no oil or grease remains), I rinsed them with a clean cloth dampened with water mixed with baking soda. Baking soda removes odors. But you already know that.
Cleaning the removable parts of the oven

Now the removable parts. Those are parts number 1 thru 4 on the sink. That’s the sink in the service area behind the house. The kitchen sink is too small for them.
While the oven walls were air drying, I sponged parts 1 thru 4 with soapy water, I scrubbed the parts of the grill where I found burnt grease, I repeated the soaping then rinsed them thoroughly with a garden hose. No kidding. Speedy taught me to use the garden hose in the service kitchen. More efficient for rinsing.
Putting back the removable parts

I wiped parts number 1 thru 4 dry then re-installed them one by one starting with the oven floor.
The oven floor in place, I re-attached the side racks.

And, finally, the pullout rack.
Voila! A clean oven that’s ready for the next baking, roasting or broiling adventure.